Setting up Single Sign-On (SSO)
Last updated: April 29, 2026
A step-by-step guide for admins configuring SSO in Niural
Overview
Niural supports SAML 2.0 based Single Sign-On (SSO), which lets your team sign in to Niural using your organization's identity provider (IdP) instead of a separate Niural password. Niural includes built-in configuration for Okta and JumpCloud, and also supports any other SAML 2.0 compatible identity provider through the Add custom SAML provider option. The setup process is the same for all identity providers. This guide walks through the flow end to end, and covers ongoing connection management and common errors.
Before you begin
Before you begin To set up SSO you'll need:
Admin access to your Niural account (specifically, access to Settings → Security).
Admin access to your identity provider so you can create a SAML application inside it.
Your IdP's SAML metadata, either as a metadata URL or as an XML file. This is generated inside your IdP once the SAML application is created
Setting up SSO
Setting up SSO The full setup takes six steps. You'll start in Niural, move over to your IdP to exchange configuration details, and return to Niural to finish.
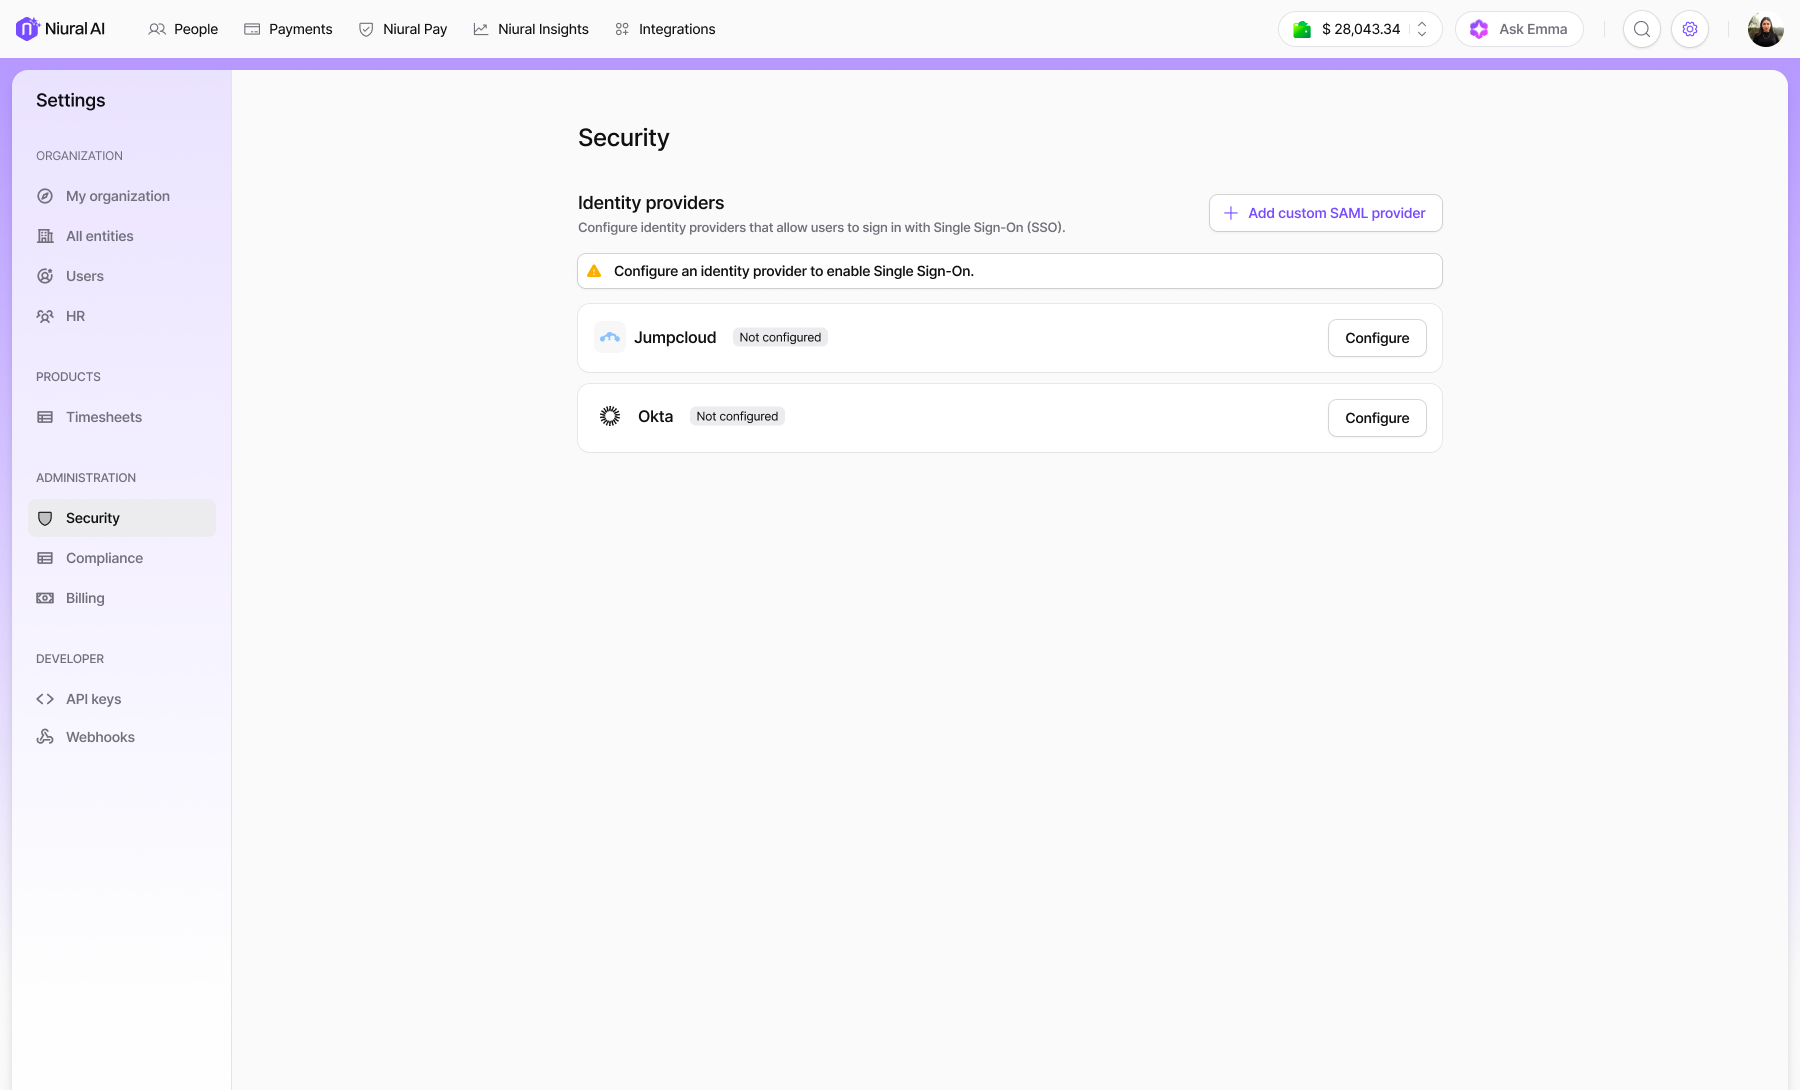
Step 1: Open Security settings
Go to Settings → Security.
Under Identity providers, you'll see the three available options: Okta, JumpCloud, and an + Add custom SAML provider button for any other IdP.
Step 2: Start configuration
Choose how you want to start:
For Okta or JumpCloud - click Configure next to the provider name. You'll go straight into the SAML details screen.
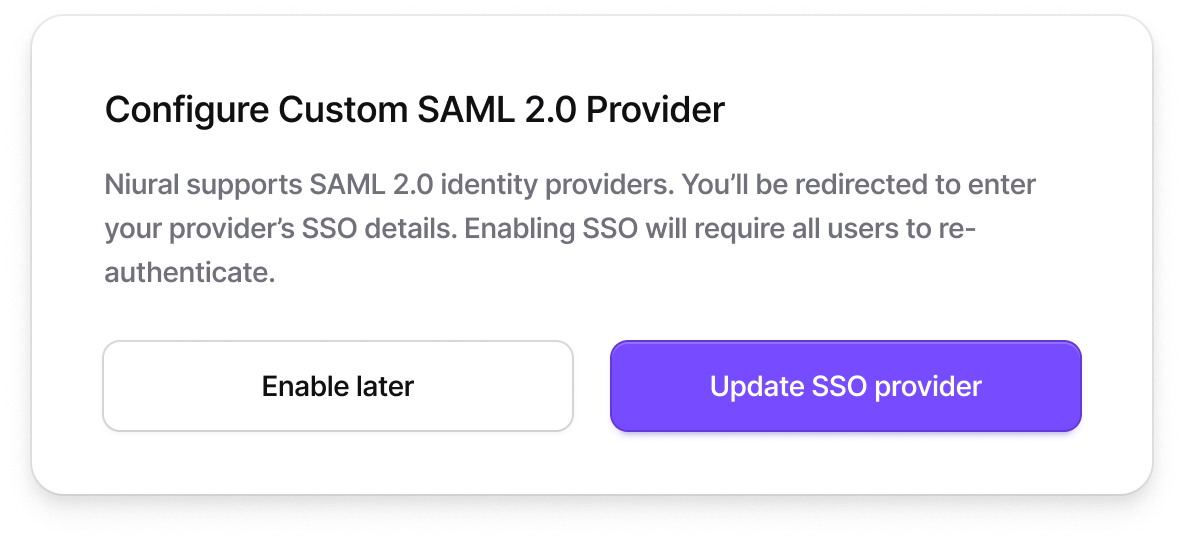
For any other IdP - click + Add custom SAML provider. A Click Enable SSO to continue, or Save and enable later to save and come back to it.
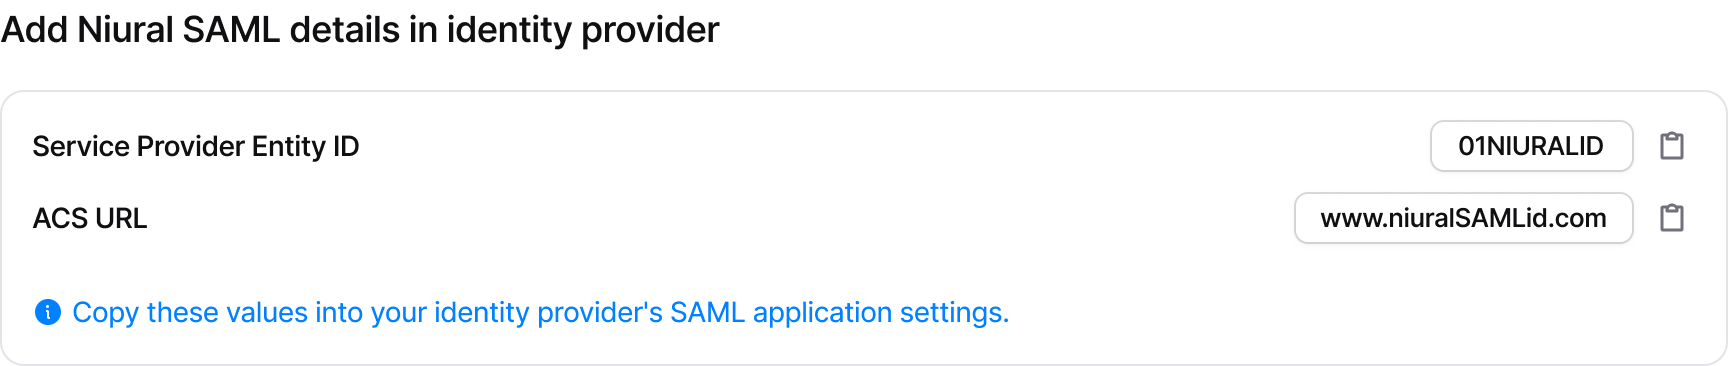
Step 3: Copy Niural SAML details into your IdP
On the configuration screen, Niural displays two values you need to copy into your IdP's SAML application settings:
Steps to copy:
Click the copy icon next to each field to copy its value.
Open your IdP's SAML application configuration in a separate tab.
Paste the Service Provider Entity ID and ACS URL into the corresponding fields in your IdP.
Save the SAML application in your IdP. Your IdP will now generate metadata (a URL, an XML file, or both) that you'll bring back to Niural in the next step.
Step 4: Add metadata from your IdP
Back on the Niural configuration screen, scroll to the "Add metadata from your identity provider" section. There are two ways to provide metadata. Choose whichever is easier to get from your IdP.
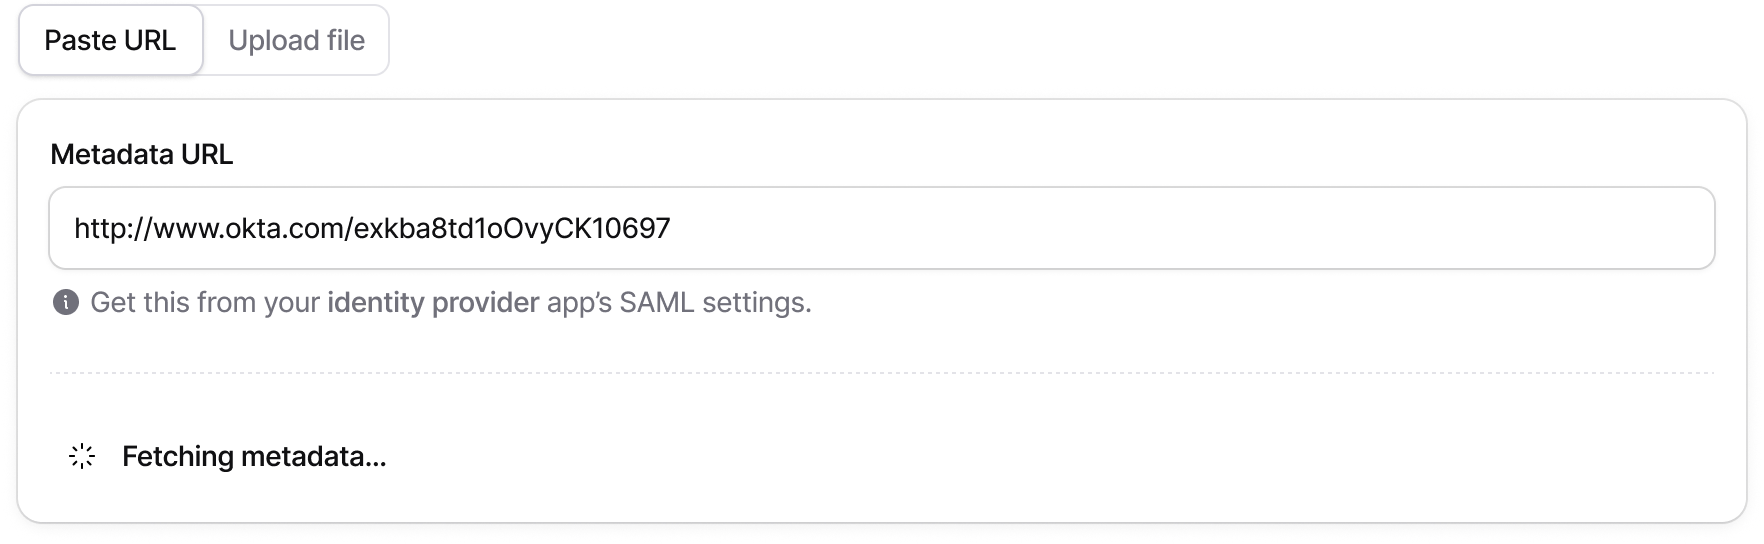
Option A: Paste URL
Select the Paste URL tab (selected by default).
Paste your IdP's metadata URL into the Metadata URL field.
Niural will fetch and parse the metadata automatically. You'll briefly see a Fetching metadata… indicator.
Once parsed, a Parsed SAML details section appears showing the Connection ID, ACS URL, and Valid until date.
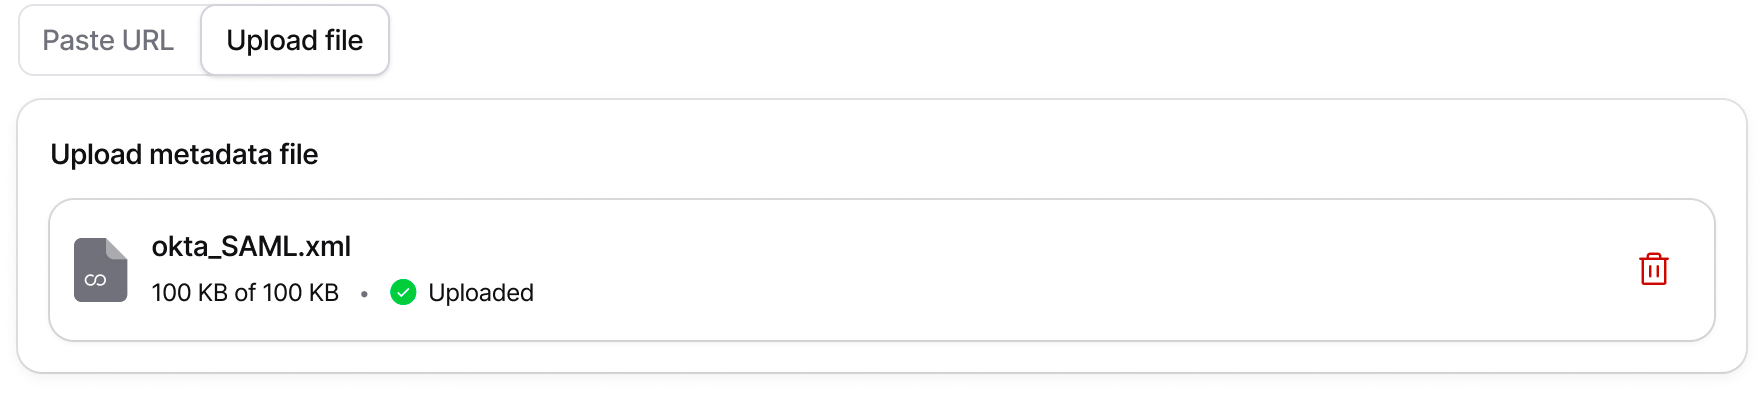
Option B: Upload file
Select the Upload file tab.
Click Upload File or drag and drop the metadata XML file you downloaded from your IdP.
Once uploaded successfully, you'll see the file name, size, and an Uploaded status, along with the parsed SAML details.
Step 5: Save the SSO connection
Once the parsed SAML details appear, the Save SSO connection button becomes active. Click it to move to the review screen.
Step 6: Enable SSO
From the review screen you have two options:
When SSO is enabled, the following happens automatically:
All users with matching email domains will sign in using SSO.
Password login may be disabled depending on your policy.
Existing sessions are not affected, users stay signed in until they log out.
Users receive an email notification about the change.
Users will see a Continue with SSO option on the login page.
Admin access is always preserved so admins can recover access if something goes wrong.
Switching between identity providers
Niural supports only one active identity provider at a time. If you already have one provider active and want to switch, activating the new one will deactivate the existing one.
When you click Enable on an inactive provider while another is active, a confirmation card appears (for example, "Activating Okta will disable JumpCloud"):

To proceed, enter your admin password and click Switch provider.
Managing an active SSO connection
Once a provider is active, the Configure button next to it in Security settings changes to Manage. Clicking Manage opens the provider detail view.
Overview
The Overview tab gives a quick read on the health of the connection. It shows the provider name, connection date, last login time, and any active alerts. For example, a signing certificate that's close to expiry.
Recent SSO activity is listed underneath with the most recent sign-ins for each user.
Configuration
The Configuration tab shows the identity provider connection details that were received from your IdP
To update the configuration, click Edit. You can paste a new metadata URL or upload a new XML file. The same flow as initial setup. After re-entering details, you'll see a Review screen with a configuration summary and an impact notice:
Click Update SSO configuration to apply the changes, or Enable later to save without activating them.
Danger zone
The Danger zone contains two destructive actions. Both require admin password confirmation.
Disable SSO
Temporarily turns off SSO without deleting the configuration. The connection can be re-enabled later.
All existing user SSO connections are unlinked immediately.
Users will need to sign in using their Niural password on their next login.
Users who don't have a password set may need to reset it to regain access.
Existing active sessions are not affected.
Delete SSO connection
Permanently removes the SSO configuration. You can set SSO up again from scratch later, but the current configuration is gone.
Users can't sign in with this IdP anymore.
Users must sign in using password or a new SSO provider on their next login.
Existing active sessions are not affected.
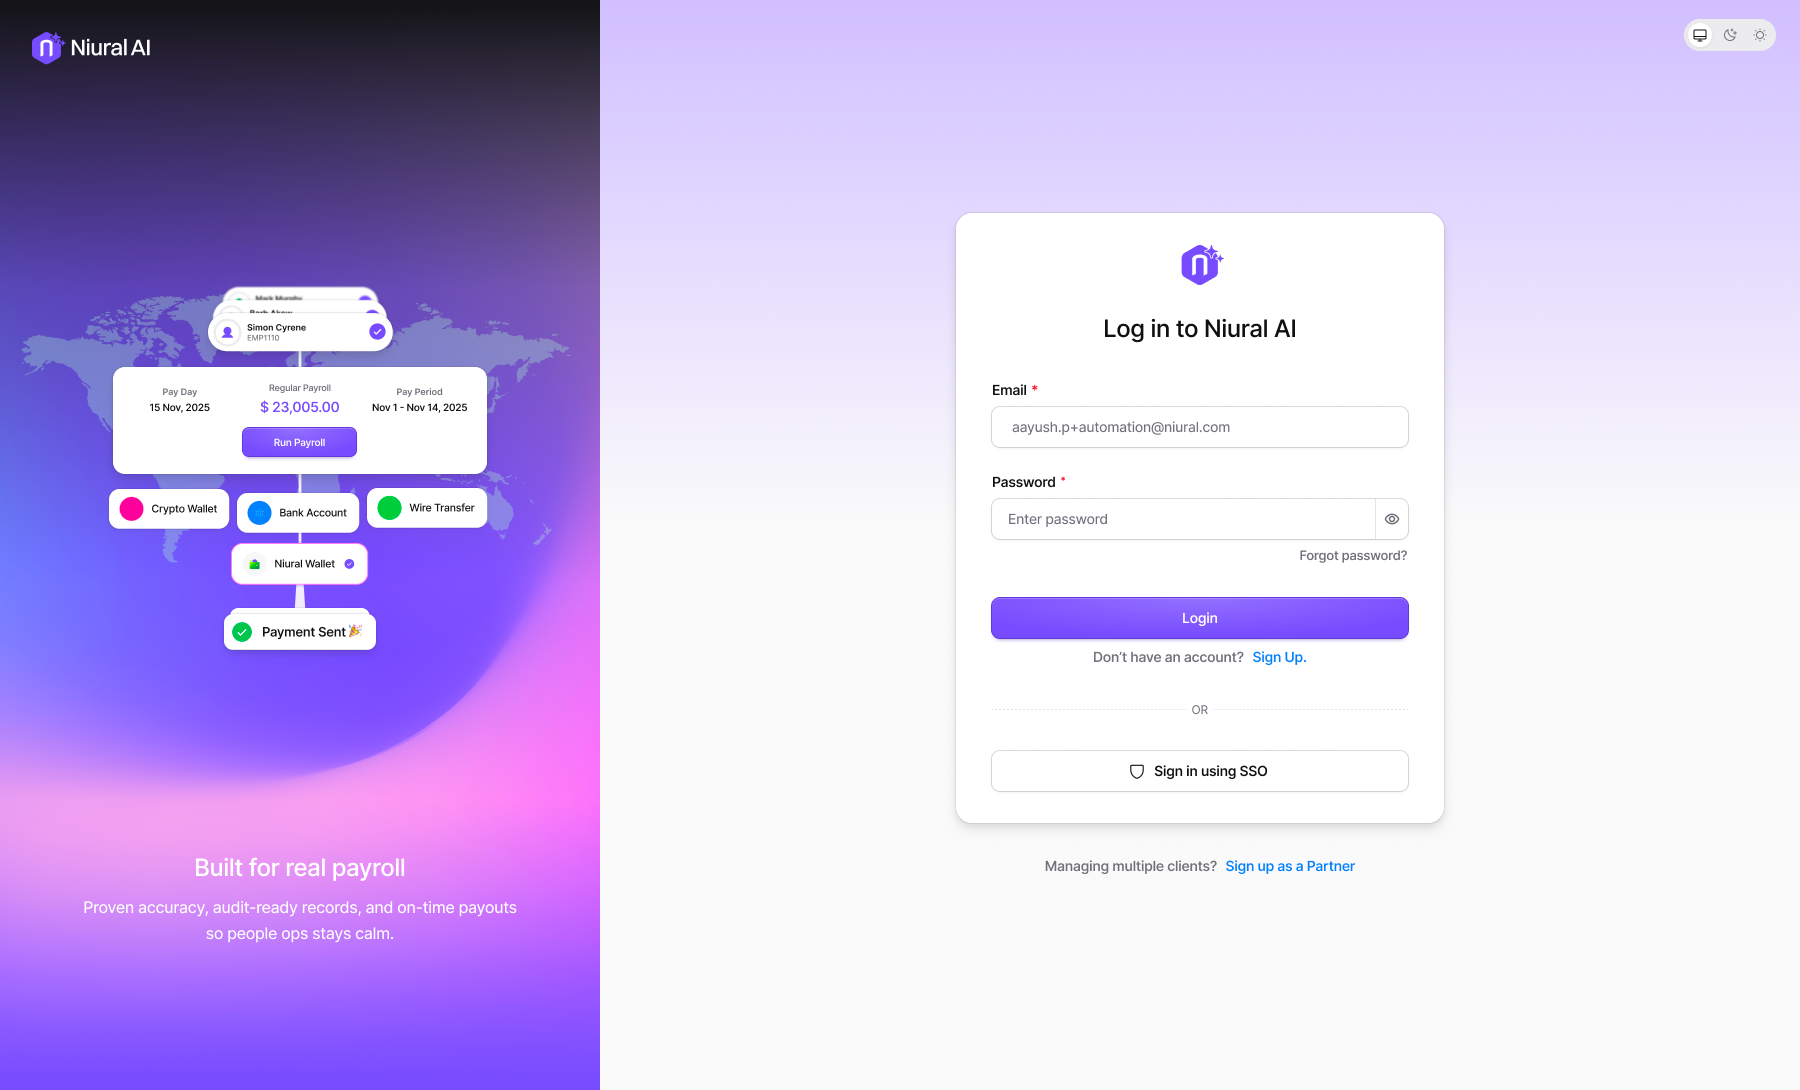
What employees see after SSO is enabled
Once SSO is active, employees have two ways to sign in from the Niural login page.
Signing in with SSO
From the login page, click Sign in using SSO below the standard email/password form.
The page switches to Sign in with your organization. The employee enters their work email and clicks Continue with SSO.
Niural verifies the organization: a brief "Verifying your organization and signing you in…" screen appears and redirects to the IdP.
After authenticating with the IdP, the employee sees a brief confirmation ("Your account has been verified successfully") and is redirected into Niural.
Falling back to personal email login
Employees who aren't part of the SSO setup for example, contractors, or users whose email domain isn't included can click Login using personal email address on the SSO login screen to switch back to standard password login.
Troubleshooting common errors
"SSO is not enabled for this email"
The employee entered an email on the SSO login page, but the email domain isn't associated with an SSO-enabled organization in Niural.
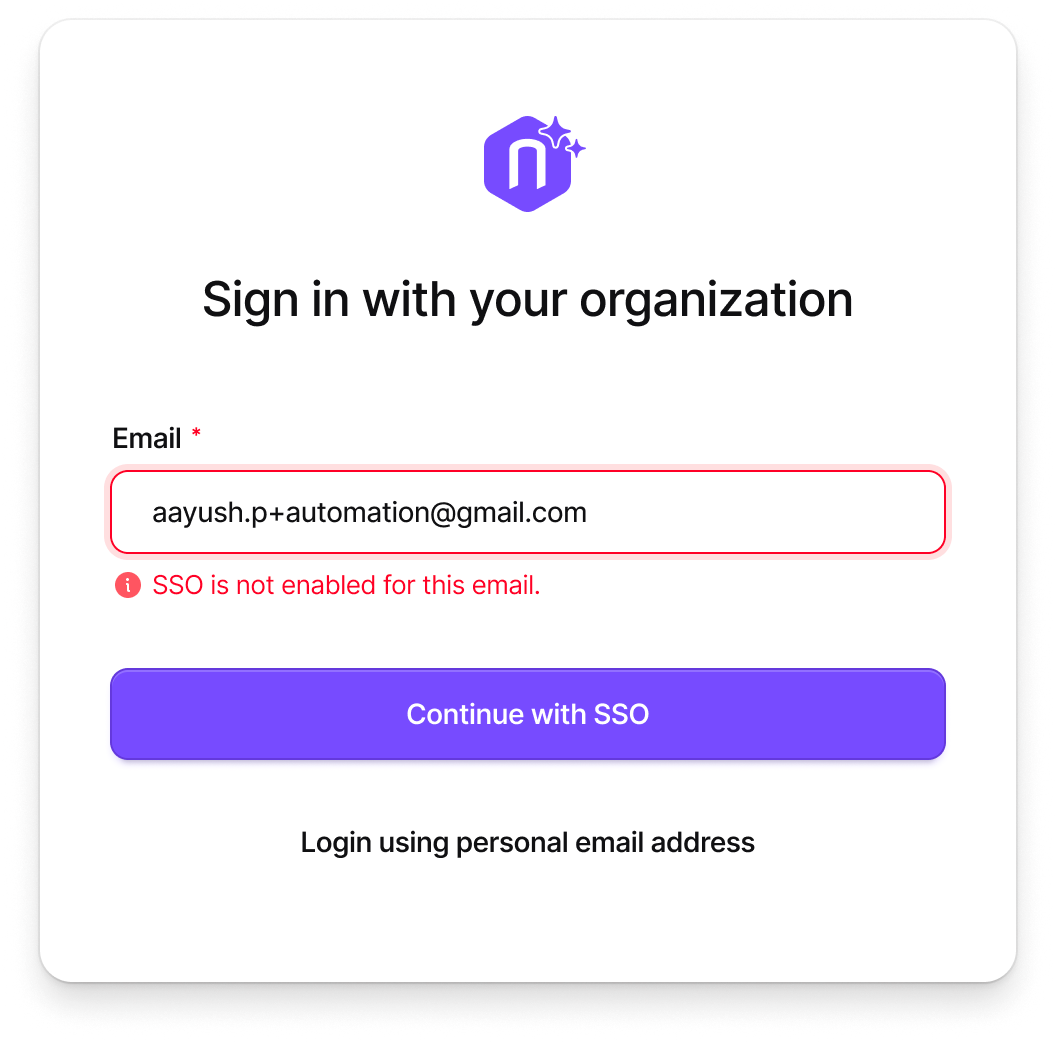
What to check:
Confirm SSO is configured and active in Settings → Security.
Verify the user's email domain matches the domain covered by your SSO configuration.
If the user isn't expected to use SSO, point them to the Login using personal email address link to sign in with a password instead.
"Unable to sign you in"
The verification screen failed to complete and the user sees: "We couldn't verify your organization at the moment. This may be a temporary issue."
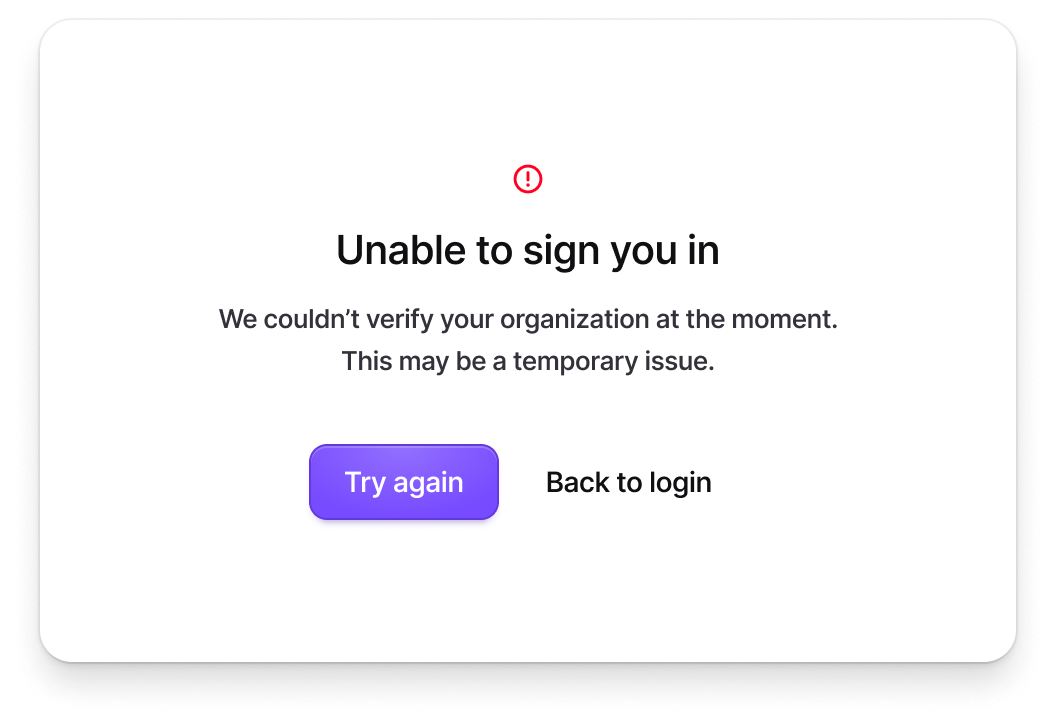
What to try:
Click Try again to retry verification this resolves most transient network or IdP hiccups.
If the retry fails, click Back to login and sign in with a password (if password login is enabled).
Check your IdP's status page or admin console for any service interruptions on the IdP side.
In Niural, go to Settings → Security and confirm the SSO configuration is still showing as Active and the certificate hasn't expired.
"Invalid certificate format" when uploading metadata
During the Upload file flow, the metadata file parsed but didn't contain a valid X.509 certificate. You'll see an error on the uploaded file and instructions to replace it.
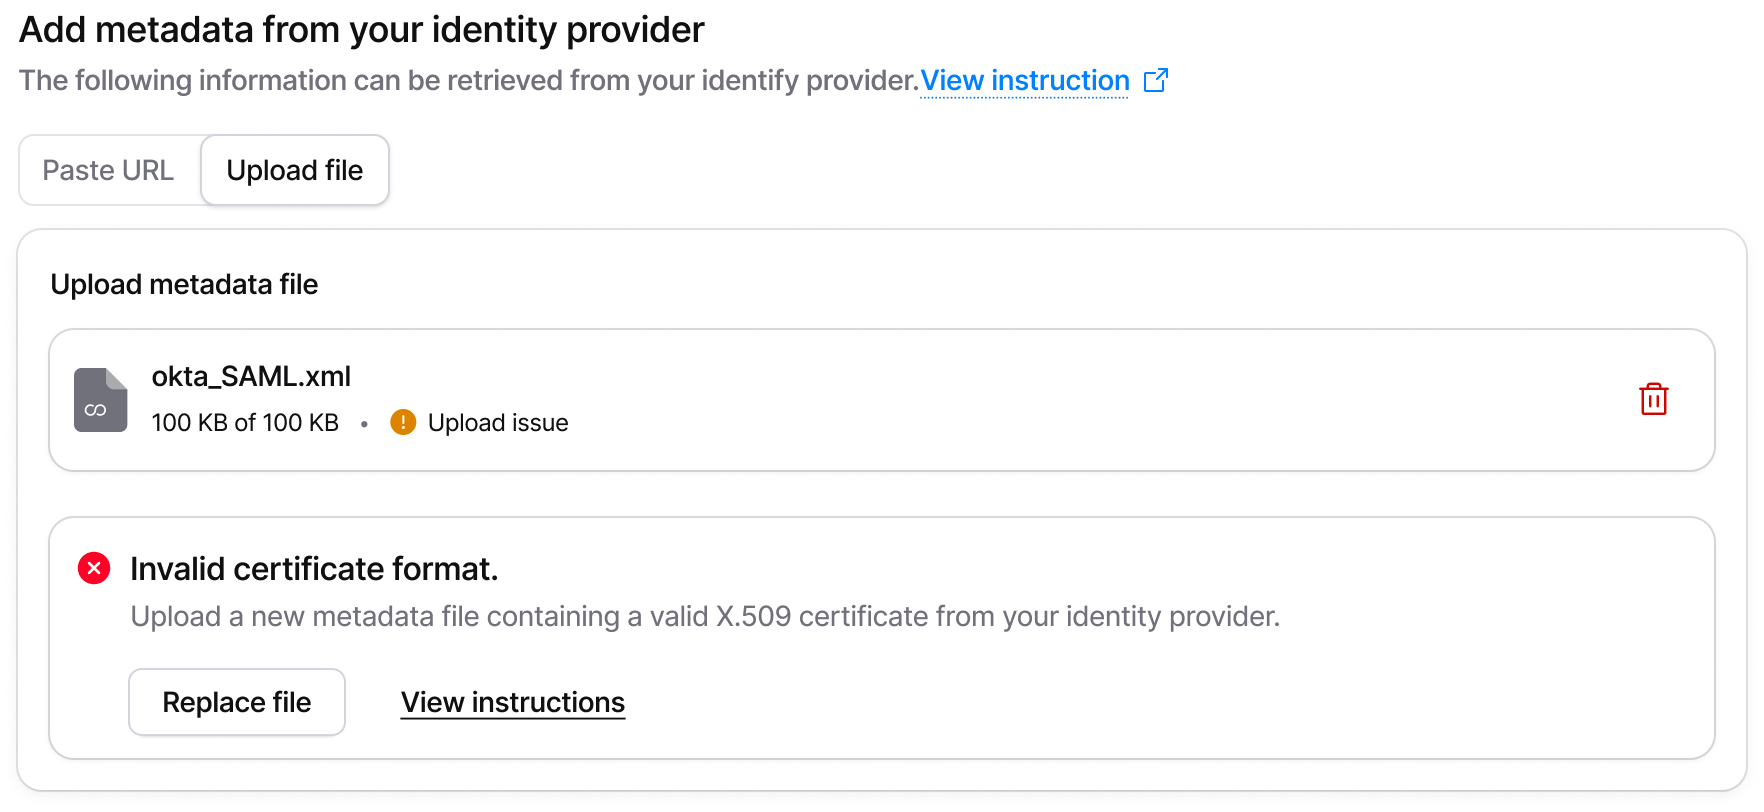
What to do:
Go back to your IdP and download a fresh metadata XML file from the SAML application settings.
Confirm the file contains a valid X.509 signing certificate. Most IdPs include this automatically if yours doesn't, you may need to enable signing or attach the certificate manually.
Click Replace file on the error card to upload the new version.
Alternatively, switch to the Paste URL tab and provide the metadata URL instead this avoids file format issues entirely.
"Signing Certificate Expiring" warning
On the provider detail page, you may see a banner like "Signing Certificate Expiring in 30 Days." SAML signing certificates typically expire every 1-3 years depending on your IdP, and an expired certificate will cause SSO sign-ins to fail.

What to do:
Click Rotate certificate on the warning banner to start the update flow. You'll need a new metadata URL or XML file from your IdP with the renewed certificate.
If you've already rotated the certificate on your IdP, go to the Configuration tab, click Edit, and re-paste the metadata URL or re-upload the metadata file to refresh the certificate on Niural's side.
You can click Dismiss on the banner to acknowledge it, but the certificate will still need to be rotated before the expiry date to avoid sign-in failures.
Removing the uploaded metadata file
If you click the delete icon next to an uploaded metadata file during setup or editing, Niural asks for confirmation:
"Removing this file will also remove the SAML configuration generated from it. You will need to upload a new metadata file or paste a metadata URL to configure SSO again."
This is not a destructive action against active users, but it does clear the parsed SAML details. Make sure you have the replacement metadata ready before confirming.